Whole genome alignment with Cactus
 Gregg Thomas
Comparative genomics requires alignments between sequences from different populations or species. While alignment of small chunks of sequence (e.g. genes) between many species is relatively straightforward, whole genome alignment has been challenging. The Cactus genome alignment software and its associated tools has made this task feasible for up to hundreds of genomes. However, this can still be technically difficult to run. Here we have developed a Snakemake pipeline to facilitate running Cactus on a computing cluster. This is done by first running a prep step that uses the cactus-prepare command to generate the Cactus labeled phylogeny, which is used to guide the submission of jobs to the cluster. For more details on how Snakemake breaks up Cactus's steps, expand the box below.
The align pipeline's rulegraph
Here is the rulegraph for the pipeline. It works in rounds based on the shape of the input phylogeny (hence the cycle). First, genomes at the tips are masked and then all internal nodes are aligned.

This pipeline is suitable for aligning genomes from different species
For pangenome inference and whole genome alignment between samples of the same species, see our Cactus-minigraph tutorial
Getting started
Requirements
You will need several things to be able to run this pipeline:
- A computing cluster that uses SLURM , which most datasets will need. It should be possible to extend the pipelines to any job scheduler that Snakemake supports .
- conda or mamba to install software. See Installing command line software if you don't have conda/mamba installed.
- Singularity, installed on your system. The pipelines run Cactus with
singularity exec, and conda can't install Singularity for you. Apptainer installs usually provide asingularitycommand too. Some clusters (such as the Harvard cluster) already have it installed. - The Harvard Informatics cactus-snakemake pipelines .
You don't need to install Snakemake or its SLURM plugin yourself. The pipelines come with a wrapper script, cactus_snakemake, that creates a conda environment with everything they need except Singularity.
Installing cactus-snakemake
The pipelines are available on GitHub. Navigate to the directory in which you want to download them, then clone the repository, move into it, and use the wrapper to create the conda environment:
git clone https://github.com/harvardinformatics/cactus-snakemake.git
cd cactus-snakemake
./cactus_snakemake setup    # create the conda environment from envs/environment.yml
./cactus_snakemake check    # confirm the environment and singularity are ready (read-only)
If you have SSH set up on GitHub, you can clone with git clone git@github.com:harvardinformatics/cactus-snakemake.git instead. If you don't have or don't wish to use git, you can download the latest release , unzip it, and run the same setup and check commands from inside the unzipped folder.
setup creates a conda environment named cactus-snakemake. check reports whether that environment exists and is up to date, and whether singularity is on your PATH. It never creates, updates, or deletes anything. You don't need to activate the environment yourself: the wrapper activates it when it runs a pipeline.
The commands in this tutorial are run from inside the cactus-snakemake folder. To run them from somewhere else, give the path to the wrapper instead of ./cactus_snakemake, for example /path/to/cactus-snakemake/cactus_snakemake. Run ./cactus_snakemake help to see every command and option.
Using a different environment name
To use a conda environment with a different name, give --env-name NAME before the command, for example ./cactus_snakemake --env-name my-cactus-env setup, or set the environment variable CACTUS_SMK_ENV_NAME. If you don't use the default name, you must give it every time you run the wrapper.
Important! cactus-snakemake v3.0.0 and later requires Cactus v3.0.0 or later.
Due to bug fixes in Cactus, v3.0.0+ of cactus-snakemake is only compatible with Cactus v3.0.0 or later. Don't worry, cactus-snakemake will always use the latest version of Cactus available unless you specify otherwise in your config file. However, if you do wish to use an older version of Cactus, you can use cactus-snakemake v2.1.0 .
Automatic partition selection
Snakemake's SLURM executor plugin can choose a partition for each job based on its resource requests, if you give it a partition config for your cluster with --slurm-partition-config <path>. You can then leave the partition: entries blank in your pipeline's config file.
If you are on the Harvard Cannon cluster, we maintain a partition config you can use. See Snakemake configuration for Cannon partition selection for its location and how to use it.
If you are not on the Harvard Cannon cluster, you can still directly specify the partitions for each rule in the config file (see below), or you may take it upon yourself to make a partition config for your own cluster.
Upgrading from cactus-snakemake v3
The way the pipelines are installed and run has changed. If you used cactus-snakemake v3:
- Set up the environment with the wrapper. Run
./cactus_snakemake setupas shown above. You no longer install Snakemake yourself, and you run the pipelines with./cactus_snakemake runinstead ofsnakemake -s. - Prep is now a separate, required step. v3 ran
cactus-prepare(orcactus-update-prepare) every time Snakemake was invoked. Now it runs only during prep, and every other run stops until prep has been done for its output directory. For an output directory from v3, run prep once with the same config and input files, then run the pipeline as before. - Two pipelines were renamed.
cactus_update.smkis nowcactus_add_genome.smk(theadd-genomepipeline) andcactus_replace.smkis nowcactus_replace_genome.smk(thereplace-genomepipeline), with their config templates renamed to match. Config keys are unchanged. skip_prepareis no longer used. If it's set, the pipelines log a warning and otherwise ignore it.
With that, you should be ready to set-up your data for the pipeline!
Inputs you need to prepare
To run this pipeline, you will need (corresponding config option given in parentheses):
- A rooted phylogenetic tree of all species to align, with or without branch lengths, in Newick format (specified in
input_file). - The softmasked genome FASTA files for each species (specified in
input_file). - A reference genome to project the alignment to MAF format (
maf_reference).
You will use these to create the input file for Cactus.
Preparing the Cactus input file
The various Cactus commands depend on a single input file with information about the genomes to align. This file is a simple tab delimited file.
The first line of the file contains the rooted input species tree in Newick format and nothing else (be sure to remember the semi-colon at the end of the Newick tree!).
Each subsequent line contains in the first column one tip label from the tree and in the second column the path to the genome FASTA file for that species.
The FASTA files must be softmasked!
The genomes you provide in FASTA format must be softmasked before running Cactus, otherwise the program will likely not complete. You can tell if a genome FASTA file is masked by the presence of lower-case nucleotides: a, t, c, or g. If your FASTA file has these lower-case characters, it has likely been softmasked. If not, you will have to mask the genome with a tool like RepeatMasker . Also importantly, the FASTA files should not be hard masked, meaning the masked bases are replaced with Ns.
For example, if one were running this pipeline on 5 species named A, B, C, D, and E, the input file may look something like this:
For more information about the Cactus input file, see their official documentation . There is also an example input file for a small test dataset here or at tests/evolverMammals/evolverMammals.txt. For more info, see section: Test dataset.
Reference sample
In order to run the last step of the workflow that converts the HAL format to a readable MAF format (See pipeline outputs for more info), you will need to select one assembly as a reference assembly. The reference assembly's coordinate system will be used for projection to MAF format. You should indicate the reference assembly in the config file (outlined below). For instance, if I wanted my reference sample in the above file to be C, I would put the string C in the maf_reference: line of the config file.
Preparing the Snakemake config file
Besides the sequence input, the pipeline needs some extra configuration to know where to look for files and write output. That is done in the config file for a given run. Create a starter config file from the pipeline's template with init:
This copies the pipeline's config template (config-templates/config-template.yaml in your cactus-snakemake folder) to my-config.yaml. Without -o, it's written to ./align-config.yaml. init won't overwrite an existing file unless you add --force. Fill in the blank fields before running prep.
See an example config file
The config for the Cactus test data can be found here or at tests/evolverMammals/evolverMammals-cfg.yaml in your cactus-snakemake folder.
The config file contains 3 sections: one for specifying the input and output options, one for specifying resources for the various rules (see below), and one for optional settings that most runs can leave blank. The first part should look something like this:
cactus_path: <path/to/cactus-singularity-image OR download OR version tag (e.g. v3.3.0)>

input_file: <path/to/cactus-input-file>

output_dir: <path/to/desired/output-directory>

final_prefix: <desired name of final .hal and .maf files with all genomes appended>

maf_reference: <Genome ID from input_file>

maf_include_anc: <True/False>

tmp_dir: <path/to/tmp-dir/>

use_gpu: <True/False>
Simply replace the string surrounded by <> with the path or option desired. Below is a table summarizing these options, along with the optional setting at the bottom of the config file:
| Option | Description |
|---|---|
cactus_path |
The Cactus Singularity image to use: a file path, a version tag (e.g. v3.3.0), or download for the latest release. This is needed whether use_gpu is True or False. See the box below the table. |
input_file |
Path to the input file containing the species tree and genome paths (described above). |
output_dir |
Directory where all the output will be written. It will be created if it doesn't exist. |
final_prefix |
The name of the final .hal and .maf files with all aligned genomes appended. The final files will be <final_prefix>.hal and <final_prefix>.<maf_reference>.maf (see Pipeline outputs). These files will be placed within output_dir. |
maf_reference |
The label for the genome to use when converting from HAL to MAF. This means that the MAF alignment will be projected on to that genome's coordinate system. |
maf_include_anc |
Whether to include the ancestral genomes in the MAF files (True/False). If False (the default), they are left out. |
tmp_dir |
A temporary directory for Snakemake and Cactus to use. Should have lots of space. |
use_gpu |
Whether to use the GPU version of Cactus for the alignment (True/False). |
singularity_bind_paths |
Optional. A YAML list of extra Singularity bind paths to add to every container command, each in src[:dest[:opts]] format, e.g. /nfs6:/nfs6 or /scratch:/scratch:rw. Only needed if some of your files are on a filesystem that isn't available inside the container by default; jobs failing to find files that do exist are the usual sign. Leave blank or set to [] to use the cluster defaults only. |
Choosing the Cactus image with cactus_path
The pipelines run Cactus from a Singularity image, set with cactus_path. It can be:
download: prep downloads the latest Cactus release.- A version tag, such as
v3.3.0or3.3.0: prep downloads that version. Always give all three parts of the version. An unquoted3.3is read by YAML as a number, and prep fails. - The path to a Cactus Singularity image you already have.
Cactus v3.0.0 or later is required.
When cactus_path is download or a version tag, prep downloads the image only once. It's saved as cactus_vX.Y.Z.sif in the directory you run prep from, and every later run uses that exact image.
In the Cactus alignment pipelines (all except Minigraph-Cactus), use_gpu decides which build of Cactus is used. With use_gpu: True, download or a version tag gets the GPU build of that version, saved as cactus_vX.Y.Z-gpu.sif. Don't add -gpu to the version tag yourself. If you give a file path with use_gpu: True, it must point to a GPU image. The Minigraph-Cactus pipeline doesn't use a GPU image.
Specifying resources for each rule
Below these options in the config file are further options for specifying resource usage for each rule that the pipeline will run, starting with a default: entry. For example:
rule_resources:
  default:
    partition: shared
    mem_mb: 10000
    cpus: 1
    gpus: 0
    time: 30

  preprocess:
    partition: shared
    mem_mb: 25000
    cpus: 8
    time: 30

  blast:
    partition: gpu     # If use_gpu is True, this must be a partition with GPUs
    mem_mb: 50000
    cpus: 48
    gpus: 2            # Set gpus or gres, not both. Both are ignored if use_gpu is False
    time: 120
The rule blast is the only one that uses GPUs if use_gpu is True.
Using GPUs
Only the blast rules request GPUs, and only when use_gpu: True is set. With use_gpu: True, the other rules also run from the GPU image, but they don't request GPUs.
- Allocate the proper partition based on
use_gpu. Ifuse_gpu: True, thepartitionin theblastentry ofrule_resourcesmust be one with GPUs. If not, the pipeline will fail to run. - Set exactly one of
gpusorgresin theblastentry:gpus: the number of GPUs to request, through Snakemake'sgpuresource.gres: a SLURM GRES request in any of these forms:1,a100:2,gpu:1, orgpu:a100:2. If thegpu:prefix is left off, the pipeline adds it before submitting the request.
- If
use_gpu: False, bothgpusandgresare ignored.
Notes on resource allocation
- Be sure to use partition names appropriate for your cluster. Several examples in this tutorial have partition names that are specific to the Harvard cluster, so be sure to change them.
- If you run with
-e slurm --slurm-partition-config <path to your cluster's partition config>, you can leave thepartition:fields blank and one will be selected for each job based on its other resources. On the Harvard Cannon cluster, you can use our partition config . - The
default:entry fills in any value that a rule's own entry leaves blank, and is used in full for rules that have no entry of their own. If neither a rule's entry nordefault:gives a value, the run stops with a "Missing resource ... no default set" error. The one exception ispartition, which may be left blank when running with-e slurm. - mem_mb is in MB and time is in minutes.
Scale resources on retry
Any resource except gpus and gres can be given as a list of per-attempt values instead of a single value. Attempt 1 uses the first value, attempt 2 uses the second, and later attempts reuse the last value. This way, failed jobs can be resubmitted with more memory or time without editing the config between restarts. For example, for the rule align, you could scale memory and runtime as follows:
Retries only happen when you add --retries N to the run command, for example:
gpus and gres can't be lists. A list there stops the run with an error.
You will have to determine the proper resource usage for your dataset. Generally, the larger the genomes, the more time and memory each job will need, and the more you will benefit from providing more CPUs and GPUs.
Click below to take a look at an example to get a sense for how many resources you will need to allot, adjusting for the genome size of your organisms.
Example: Resource usage on a dataset of 22 turtle genomes
Example: Resource usage on a dataset of 22 turtle genomes
We have run the pipeline on 22 turtle genomes. The average genome size is 2210 Mb (2.2 Gb):
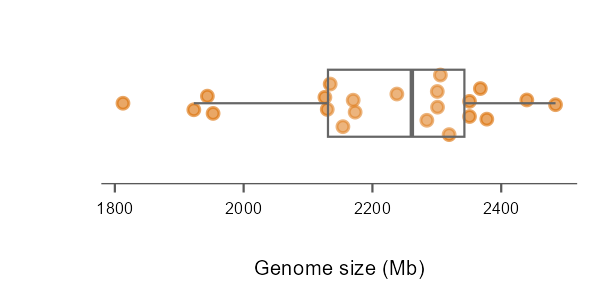
We allocated the following resources for the Cactus rules:
GPU usage in Cactus has changed over time
Note that in this example GPUs were used for 3 rules: Preprocess, Blast, and Align. Current versions of cactus only use GPUs for the Blast rule, so you will only see GPU usage and improvements for that rule. See this issue in the Cactus github repo for more information.
| Step | Partition | Memory | CPUs | GPUs | Time |
|---|---|---|---|---|---|
| Preprocess | gpu | 100g | 8 | 2 | 1h |
| Blast | gpu | 400g | 64 | 1 | 12h |
| Align | gpu | 450g | 64 | 2 | 12h |
This resulted in the following real run times:
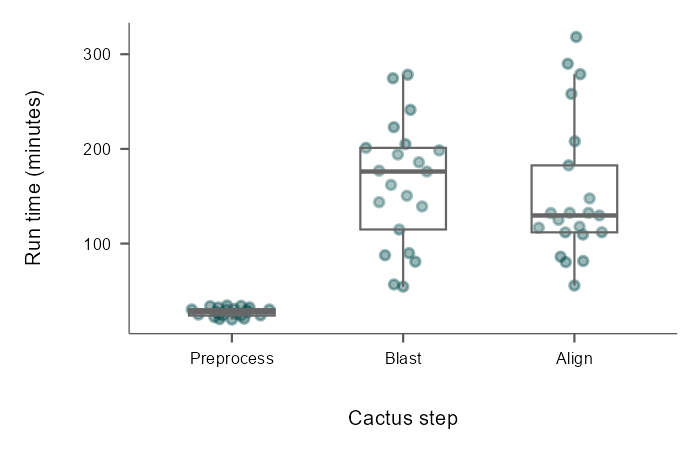
In general, increasing or decreasing CPUs or GPUs available will decrease runtime.
And max memory usages:
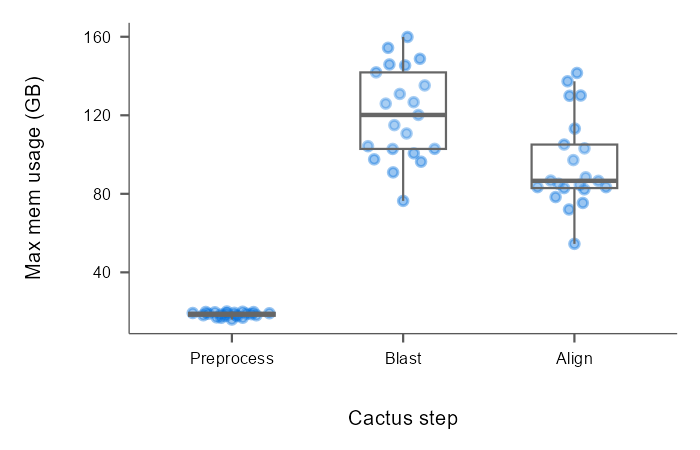
Increasing available memory may also decrease runtime.
Running the pipeline
With everything installed, the Cactus input file, and the config file set up, you are now ready to run the pipeline. This takes three steps: prep, a dry-run, and then the real run.
Prep
Prep is run once for each output directory, before the pipeline itself:
For this pipeline, prep resolves the Cactus image (downloading it if cactus_path is download or a version tag) and runs cactus-prepare to generate the labeled phylogeny that guides the submission of jobs. Its log is written to <output_dir>/logs/cactus-prepare.log. cactus-prepare also leaves an empty jobstore/ directory where it's run. It's harmless.
Prep runs on the node you start it from, not as a cluster job. It records what it did in <output_dir>/prep-manifest.yaml. Every later run, including each job submitted to the cluster, reads that manifest instead of repeating prep, and stops with an error if:
- prep hasn't been run for the output directory yet. The error gives the command to run.
- the config or input files that prep depended on have changed since (for example the tree in
input_file,cactus_path, or where a new genome goes), or a file prep wrote has been changed. The error lists what changed.
If a change is intended, run prep again with --force:
Files already in the output directory were made from the earlier prep and are not deleted, so for anything that changes the tree, a new output directory is usually the safer choice.
Do a --dryrun first
Next, we want to make sure everything is set up properly by using the --dryrun option. This tells Snakemake to display what jobs it is going to run without actually submitting them. This is important to do before actually submitting the jobs so we can catch any setup errors beforehand.
Command breakdown
| Command-line option | Description |
|---|---|
./cactus_snakemake run |
Activates the pipelines' conda environment and runs Snakemake. Everything after the pipeline name is passed to Snakemake unchanged. |
<pipeline> |
The pipeline to run: align, add-genome, replace-genome, add-outgroup, or minigraph. This picks the workflow file (Snakefile), so don't give -s or --snakefile. |
--configfile my-config.yaml |
The path to your config file. See: Preparing the Snakemake config file. |
-j 20 |
The maximum number of jobs that will be submitted to your cluster at one time. Always give it with -e slurm: recent Snakemake versions require it, even for a dry-run. |
-e slurm |
Use the SLURM executor plugin to submit jobs to the cluster. If you leave out -e and aren't in a SLURM allocation, the wrapper warns that everything will run on the current node. |
--dryrun |
Do not execute anything, just display what would be done. |
--slurm-partition-config <path> |
Optional. Lets the SLURM plugin choose a partition for each job, so the partition: entries in your config can be left blank. On the Harvard Cannon cluster, see our partition config. |
--retries N |
Optional. Resubmit failed jobs up to N times, using per-attempt resources if you've set them (see Specifying resources for each rule). |
If this completes successfully, you should see a bunch of blue, yellow, and green text on the screen, ending with a summary of the jobs to be run. For the repo's test dataset (5 genomes and 4 ancestors), it looks like this:
Job stats:
job           count
----------  -------
preprocess        5
blast             4
align             4
convert           4
copy_hal          1
append            1
maf               1
all               1
total            21
The job counts depend on your data, here on the number of genomes and internal nodes in the tree. The order of the rows can differ between Snakemake versions.
If you see any red text, that likely means an error has occurred that must be addressed before you run the pipeline.
Submitting the jobs
If you're satisfied that the --dryrun has completed successfully and you are ready to start submitting Cactus jobs to the cluster, you can do so by simply removing the --dryrun option from the command above:
This will start submitting jobs to SLURM. On your screen, you will see continuous updates regarding job status in blue text. In another terminal, you can also check on the status of your jobs by running squeue -u <your user id>.
Be sure you have a way to keep the main Snakemake process running.
Remember, that some of these steps can take a long time, or your jobs may be stuck in the queue for a while. That means the Snakemake job must have a persistent connection in order to keep running and submitting jobs. There are a few ways this can be accomplished, some better than others:
-
Keep your computer on and connected to the cluster. This may be infeasible and you may still suffer from connection issues. -
Run the Snakemake job in the background by usingnohup <run command> &. This will run the command in the background and persist even if you disconnect. However, it makes it difficult to check on the status of your command. -
Submit the
./cactus_snakemake runcommand itself as a SLURM job. This will require preparing and submitting a job script . This is a good solution. -
Use a terminal multiplexer like GNU Screen or tmux . These programs allow you to open a sub-terminal within your currently connected terminal that remains even after you disconnect from the server. This is also a good solution.
Depending on the number of genomes, their sizes, and your wait in the queue, you will hopefully have your whole genome alignment within a few days!
Test dataset
Cactus provides a test dataset which we have set up to run in the tests/evolverMammals/ folder of the cactus-snakemake repo.
Here is a breakdown of the files so you can investigate them and prepare similar ones for your project:
| File/directory | Description |
|---|---|
evolverMammals-seq/ |
This directory contains the input sequence files for the test dataset in FASTA format. |
evolverMammals-cfg.yaml |
This is the config file for this pipeline and has all of the options you would need to set up for your own project. |
evolverMammals.txt |
This is the input file as required by Cactus. It has the rooted Newick tree on the first line, followed by lines containing the location of the sequence files for each tip in the tree. |
We recommend running this test dataset before setting up your own project. The config file doesn't need any edits: it downloads the latest Cactus image, uses its own temporary directory inside tests/evolverMammals/, and leaves the partitions blank. Its output is written to tests/evolverMammals/evolverMammals-align-out/.
The paths in the config file are relative to the dataset's folder, so the test is run from there. Change into tests/evolverMammals/, then run prep and a dry-run:
cd tests/evolverMammals/
../../cactus_snakemake prep align --configfile evolverMammals-cfg.yaml
../../cactus_snakemake run align --configfile evolverMammals-cfg.yaml -j 20 -e slurm --dryrun
Prep downloads the Cactus image once, into tests/evolverMammals/. If the dry-run completes without error, run the pipeline by removing the --dryrun option:
Since the partitions are blank, you can optionally add --slurm-partition-config <path> to these commands to have partitions selected automatically.
Pipeline outputs
The pipeline will output a .paf , a .hal , and a .fa file for every node in the input tree (including ancestral sequences). The final alignment file will be <final_prefix>.hal, where <final_prefix> is whatever you specified in the config file.
The final alignment will also be presented in MAF format as <final_prefix>.<maf_reference>.maf, again where <maf_reference> is whatever you set in the config file. This file will include duplicate sequences. Another MAF file, <final_prefix>.<maf_reference>.nodupes.maf will also be generated, which is the alignment in MAF format with no duplicate sequences. The de-duplicated MAF file is generated with --dupeMode single. By default (maf_include_anc: False), the ancestral genomes are left out of the MAF files (cactus-hal2maf --noAncestors). Set maf_include_anc: True to include them. See the Cactus documentation regarding MAF export for more info.
Prep also writes <output_dir>/prep-manifest.yaml, its record of what it did. The <output_dir>/logs/ folder holds cactus-prepare.log and, for each preprocess job, a <genome>.preprocess.seqfile.txt: the copy of the input file given to cactus-preprocess, kept for reference.
A suite of tools called HAL tools is included with the Cactus singularity image if you need to manipulate or analyze .hal files. There are many tools for manipulating MAF files, though they are not always easy to use. The makers of Cactus also develop taffy , which can manipulate MAF files by converting them to TAF files.
Questions/troubleshooting
How can I tell if my input Newick tree is rooted? If it isn't rooted, how can I root it? Or if it is rooted, how can I re-root it?
How can I tell if my input Newick tree is rooted?
The easiest way to check if your tree is rooted is probably to load the tree into R with the ape package. This can be done with the following commands:
install.packages("ape") # Only if you don't have it installed already
library(ape)
tree <- read.tree("your-tree.nwk")
is.rooted(tree)
If the result of this text is TRUE then your tree is rooted. If it is FALSE your tree is unrooted.
If the tree is unrooted, or you want to re-root it, you can also do this in R with the root() function. Make sure ape is installed and loaded as above, and then:
Root by a tip label:
Or root by an internal node number:
In the second case, using the internal node number, if you need to know how R has labeled the nodes, you can view the tree with the node labels by doing:
After the tree has been rooted/re-rooted, you can write it to a file:
How can I tell if my genome FASTA files are softmasked? How can I mask them if they aren't already?
How can I tell if my genome FASTA files are softmasked?
Cactus requires the input genomes to be softmasked. This means that masked bases appear as lower case letters: a, t, c, g. Hopefully the source of your genome FASTA file has given you some information about how it was prepared, including how it was masked. If not, a very quick method to check for the occurrence of any lower case letter in the sequence is:
if grep -q '^[^>]*[a-z]' your-genome-file.fa; then echo "The FASTA file is soft-masked."; else echo "The FASTA file is NOT soft-masked."; fi
This is fast, but only detects the occurrence of a single lower case character. To count all the lower case characters at the cost of taking a couple of minutes, you can run:
awk 'BEGIN{count=0} !/^>/{for(i=1;i<=length($0);i++) if (substr($0,i,1) ~ /[acgt]/) count++} END{print count}' your-genome-file.fa
Importantly, your genomes should not be hard masked , which means that masked bases are replaced by Ns. Unfortunately, there are many reasons for Ns to appear in a genome fasta file, so it is difficult to tell if it is because it is hardmasked based on the presence of Ns alone. Hopefully the source of the file has left some documentation describing how it was prepared...
If your genomes are not softmasked and you wish to do so, you will have to run a program like RepeatMasker or RepeatModeler on it. Please consult the documentation for these tools.
I got an error related to InsufficientSystemResources regarding GPUs during run_lastz in a blast rule. What do I do?
blast GPU error
If the text of the error is somewhat similar to:
toil.batchSystems.abstractBatchSystem.InsufficientSystemResources: The job 'run_lastz' kind-run_lastz/instance-tqdjs4tj v1 is requesting [{'count': 4, 'kind': 'gpu', 'api': 'cuda', 'brand': 'nvidia'}] accelerators, more than the maximum of [{'kind': 'gpu', 'brand': 'nvidia', 'api': 'cuda', 'count': 1}, {'kind': 'gpu', 'brand': 'nvidia', 'api': 'cuda', 'count': 1}] accelerators that SingleMachineBatchSystem was configured with. The accelerator {'count': 4, 'kind': 'gpu', 'api': 'cuda', 'brand': 'nvidia'} could not be provided. Scale is set to 1.
it may be because your GPU partition is set up to use MIGs (Multi-instance GPUs) . This is essentially like a multi-core CPU, except for GPUs. The problem is that Cactus isn't set up to recognize these as of the last update of this tutorial. It only recognizes physical GPU devices. For instance, let's say you've requested 4 GPUs for the blast rules by setting gpus: 4 (or gres: 4) in the blast entry of rule_resources in your config file. The blast job is submitted to your GPU node, which allocates 2 physical GPUs set up as MIGs, each with 2 instances, which is the equivalent of 4 GPUs. However, Cactus only sees the 2 physical GPUs and thinks there aren't enough to accommodate your request for 4, resulting in the error.
To resolve this, check your cluster documentation to see if there is a way to use only physical GPUs instead of MIGs. If not, you will have to request a single GPU (gpus: 1 or gres: 1) in the blast entry. That is the only way to guarantee that the number of physical GPUs aligns with your request.
My jobs were running but my Snakemake process crashed because of connection issues/server maintenance! What do I do?
Snakemake crashes
As long as there wasn't an error with one of the jobs, Snakemake is designed to be able to resume and resubmit jobs pretty seamlessly. You just need to run the same ./cactus_snakemake run command you ran to begin with and it should pick up submitting jobs where it left off. You don't need to run prep again. You could also run a --dryrun first and it should tell you which jobs are left to be done.
My run stopped with an error about prep. What do I do?
Prep errors
Every run reads the record prep wrote, <output_dir>/prep-manifest.yaml, and stops if:
- prep hasn't been run for this output directory. Run the prep command given in the error, then run the pipeline again.
-
the config or input files that prep depended on have changed since prep was run, or a file prep wrote has been changed. The error lists what changed. If you didn't mean to make those changes, undo them. If you did, run prep again with
--force:Files already in the output directory were made from the earlier prep and are not deleted. If the change affects the tree, starting over in a new output directory is usually the safer choice.
See Prep for more information.
I want to run this on a cluster with a job scheduler other than SLURM! What do I do?
Clusters other than SLURM?
Generally, it should be relatively easy to install and use the appropriate Snakemake cluster executor .
If you need help or run into problems, please create an issue on the pipeline's github and we'll try and help - though it will likely be up to you to test on your own cluster, since we only have easy access to a cluster running SLURM.
I tried to run the pipeline and I ran into an error that I don't understand or can't resolve. What do I do?
Encountering errors
Please search for or create an issue on the pipeline's github that includes information about your input files, the command you ran, and the error that you are getting. The text of any log files would also be appreciated.
Additionally, if you are at Harvard, there are several ways to contact us to help you through your errors.
I have an idea to improve or add to the pipeline. What do I do?
Pipeline improvements
Great! Please create an issue on the pipeline's github describing your idea so we can discuss its implementation!
Can I run the pipelines without the cactus_snakemake wrapper?
Running without the wrapper
Yes, though we recommend the wrapper for most users. The wrapper only runs Snakemake for you, so the same steps work with Snakemake directly, from a conda environment that has the packages listed in envs/environment.yml in the cactus-snakemake folder.
Without the wrapper, you give the pipeline's workflow file (Snakefile) with -s:
| Pipeline | Snakefile |
|---|---|
align |
cactus.smk |
add-genome |
cactus_add_genome.smk |
replace-genome |
cactus_replace_genome.smk |
add-outgroup |
cactus_add_outgroup.smk |
minigraph |
cactus_minigraph.smk |
The prep, dry-run, and run steps are then, shown here for the align pipeline from inside the cactus-snakemake folder:
snakemake -s cactus.smk --configfile my-config.yaml --config prep=T
snakemake -s cactus.smk --configfile my-config.yaml -j 20 -e slurm --dryrun
snakemake -s cactus.smk --configfile my-config.yaml -j 20 -e slurm
As with the wrapper, the prep step is required once per output directory before the pipeline can run. These options can be given with --config:
| Command line flag | Description |
|---|---|
--config prep=T |
Run the prep step and exit. Required once per output directory before the pipeline can run. |
--config prep=T prep_force=T |
Run prep again even though the config or input files have changed since the last prep. |
--config debug=T |
The same as prep, but display extra information about the pre-processing steps. |
--config display=T |
Print the current config settings and exit. |
--config info=T |
Display some information about the pipelines, including version and last commit date. |
--config version=T |
Display the version of the pipeline. |