Review of paper and get everyone caught up
For those of us who may not have been here on day 1, we're going to be working on reproducing a paper that looked at evolution of E. coli transcription over the course of 22 years. We're going to be going through this general workflow which runs from acquiring the raw data to cleaning the data, and then analyzing and finishing with visualization.

However, all ths scripts and some of the intermediate files will be provided for you so you can focus on the project management side and have the data analysis as a backdrop. To that end, to make sure we're on the same page, let's make sure we all have our project directory set up.
Setup
Log in to the cluster
Navigate to
/holyscratch01/<USERNAME>/Create a project directory and enter it:
- Copy the project data to your directory:
- Navigate to the project directory for this workshop that we created on Day 1:
Create sub-folders
software,data_raw, andscriptsand organize the project directory.Create a project directory on your local computer and copy the files over using your preferred method
Software
This sets us up with the data we need for our project. However, to do any sort of analysis, we'll need to use software. Software is any computer program that performs a function. A lot of software comes with any given computer, and a lot of it is necessary for the computer to run (e.g. the Operating System). For the most part though, any data analysis in any particular domain will require specialized software. For example, to analyze DNA sequences, you might use software like samtools or bedtools, which are not typically installed on a computer by default. That means a big chunk of analysis is reading about the available softare, deciding on what you need for your analysis, and then installing it.
Terminology
Before we get into the specifics of installing software, let's go over some terminology. There are many different terms that are used to describe software, and it can be confusing. Here are some common ones:
| Term | Definition |
|---|---|
| Program | A specific set of ordered operations for a computer to perform. |
| Software | Any computer program that performs a function. |
| Script | A type of program written in a scripting language. |
| Application | A type of software that is designed to perform a specific set of tasks or activities for the user. |
| Package | A bundle of software and the metadata required to deploy it. |
| Library | A collection of pre-compiled pieces of code that can be reused in a program. Generally can't be run on its own. |
You'll notice that a lot of these definitions are very similar, and as such the terms are often used interchangeably. For example, you might hear someone refer to a program as a piece of software, or a script as a program. This is fine, but it can be confusing, so it's helpful to know the different terms.
Dependencies
Software often bundles a lot of programs and libraries together. For example, the samtools software is actually a collection of programs that all work together to perform a specific task. This is called a dependency. Dependencies are other pieces of code that a given software needs to run. For example, samtools needs htslib to run. This is important because if you install samtools on your computer, you need to make sure that htslib is also installed. This can get complicated because htslib might need zlib to run, and zlib might need libpng to run, and so on. This is why software management is important.
These dependencies also need to be in a location that is findable by the main program. Typically, there are a few environement variables that tell the computer where to look for programs and their dependencies. One of these, on Unix systems, is $PATH.
Type the following intouy your terminal:
This will show you a list of directories that the computer looks in when you type a command. For example, if you type samtools into the terminal, the computer will look in each of these directories for a program called samtools. If it finds it, it will run it. If it doesn't, it will tell you that it can't find it, typically with a command not found error.
Similarly, when you install software, there are other directories that the computer looks in for dependencies.
Ok, well why does any of this matter when we want to install software?
File systems and permissions
We showed you this the other day:
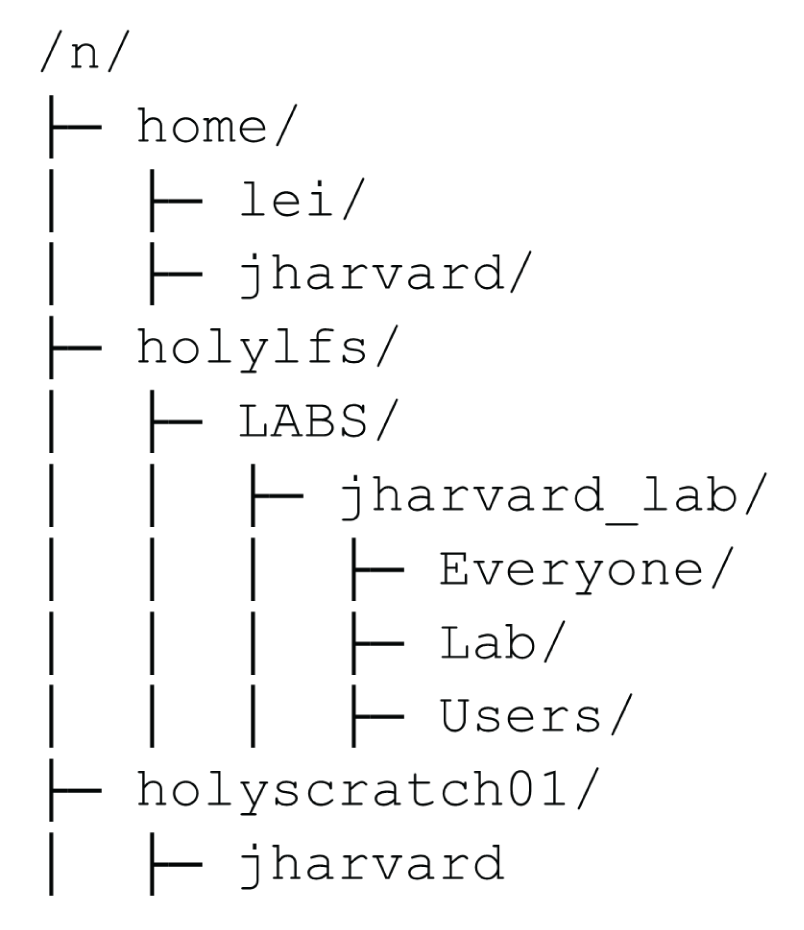
This show's a cluster users typical view of the file system. The home directory is where you have a small amount of space for your personal files. The holyscratch01 directory is where you have a large amount of space for temporary files. The holylfs is where each lab group has a large amount of space for their files. The directory where we have put the data for this workshop is in holyscratch01/<USERNAME>/healthy-habits/.
However, this is not the entire file system for the remote computer you're operating on. Typically, the ROOT directory of a computer, that is the start of the file system, is / for Unix systems and C:\ for Windows systems. The root directory contains all the files and directories on the computer, including the files and programs necessary for the computer to run. If we take a look at the root directory of any given login node on the cluster, it will look something like this:
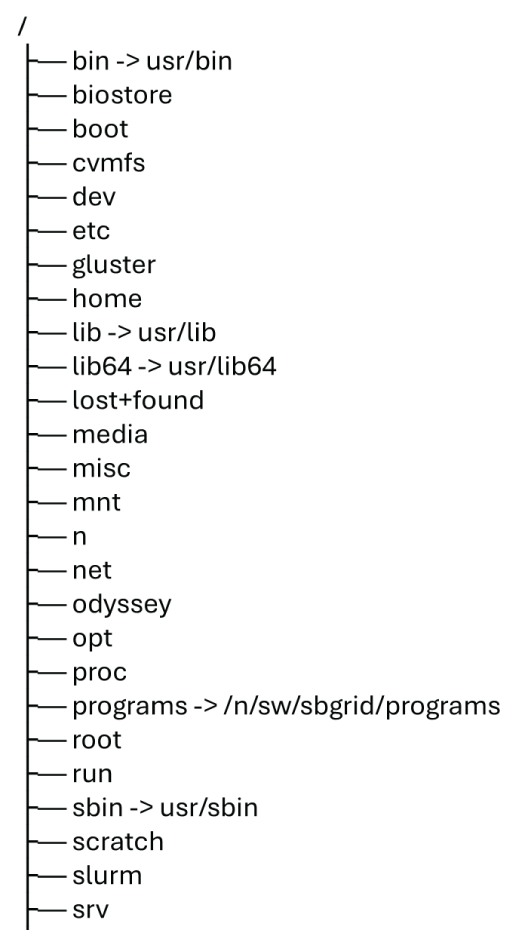
You almost never want to modify files or install software in the root directory because this can cause the computer to malfunction. Even experienced system administrators are careful about what they do in the root directory. Needless to say then, on a cluster with many users, the best practice is to make the root directory read-only.
However, most software is not developed on a cluster, so there are several assumptions that are commonly made when the writers of that software release it for others to install, key among them that the user will have full write permissions to the root directory of the computer that they are installing the software on. But this definitely isn't the case.
Type the following in your terminal:
This will show you the contents of the root directory and the permissions of each file and directory. The permissions are the first column of the output. They look like this:
This is a directory, and the permissions are rwxr-xr-x. The first three characters are the permissions for the owner of the file, the second three are the permissions for the group that the file belongs to, and the last three are the permissions for everyone else. The r stands for read, the w stands for write, and the x stands for execute. So, in this case, the owner of the file can read, write, and execute the file, and everyone else can only read and execute the file.
This means, that if we tried to manually install software on this computer, we would run into errors because we don't have write permissions in these directories. There are ways around this, such as changing your path variables, setting the library directories when you're installing the software, and installing all dependencies manually as well, but this is not recommonded because it's a lot of work and it's easy to make mistakes.
Instead, we'll talk about two ways we can make software installation easier:
- Containers
- Environments
Containers
Containers are a way to package up software and all of its dependencies into a single file. This file can then be run on any computer that has the software that can run the container. This is a way to get around the permissions issue because the container is run in a way that doesn't require write permissions to the root directory. There are a few different types of containers, but the two most popular are Docker and Singularity. Docker is the most popular, but Singularity is used on HPC systems (clusters) because it's designed to be run on systems where the user doesn't have write permissions to the root directory.
Singularity
Singularity images are typically stored as .sif files. These files can be run on any computer that has Singularity installed. Singularity is installed on the Cannon cluster, so we can use it to run our software. We can also use it to build our own containers, but we won't be doing that today.
We've provided a Singularity image for the sra-tools program that we used to download the raw fastq files from the paper we'll be working on. It should be in the software directory of the project directory and it is called sra-tools-3.0.1.sif.
Type the following into your terminal (
fastq-dumpis one of the programs included withsra-tools). What happens?
We do not have the sra-tools program installed on the cluster so we should see an error along the lines of command not found. However, we can use the sra-tools Singularity container to run the program.
There are two ways we can execute commands from a container.
- The first is with
singularity exec <singularity image file> <command>. This will run a whatever<command>you give it from the container and then exit. For instance, we can get the help menu for sra-tools.
Type the following into your terminal:
Now we should see the full help menu for this program, and, if we wanted to, we could run the program from the Singularity container.
- Another way we can run programs from a Singularity container is with
singularity shell <singularity image file>. This will open a new shell that is running from the container. This is useful if we want to run a lot of commands from the container interactively, or if we want to run a program that requires a lot of input files.
Type the following into your terminal:
You should see a new prompt in the terminal:
Singularity>
This is the prompt for the new shell that is running from the container. We can run any command that is in the container from this shell. For example, we can run the fastq-dump program.
Type the following into your terminal:
This should show you the help menu for the fastq-dump program. This is the same as the help menu we saw when we ran the program with singularity exec.
From within this shell, we can run any program that is installed in the container, even common Unix commands like ls work. However, any program that we have installed outside of the container (on the normal file system) will not be available from within the container.
Let's exit our container shell.
Type the following into your terminal:
This will take you back to the normal shell.
BONUS: Converting Docker images to Singularity images
Docker is the most popular container system, and there are many more Docker images available than Singularity images. However, Docker images cannot be run on the Cannon cluster. But we can convert Docker images to Singularity images. This is a bit more complicated than just running a Singularity image, but it's not too difficult.
- Create an account on the Singularity website and login.
- Generate an access token and copy it, or if you still have an active token just copy it.
- On the cluster, run
singularity remote loginand paste the access token when prompted. - Run
singularity build <name of new singularity image file> docker://<docker image name>. This will download the Docker image and convert it to a Singularity image.
Where can you find docker containers? Try searching quay.io; the biocontainers organization keeps many tools up to date there. For singularity containers, the galaxy project has an FTP server with many containers and can be found here: https://depot.galaxyproject.org/singularity/
Environments
While containers create a single file that contains an image of an operating system where the program you want to run is already installed, software environments essentially set-up folders on your computer and update your PATH variables so that you can run the software you want to run. This is a bit more complicated than running a container, but it's also more flexible. For example, you can have multiple environments on your computer, and you can switch between them. This is useful if you're working on multiple projects that require different versions of the same software. It's also useful if you're working on a project that requires a lot of software, because you can install all of the software you need in one environment and then switch to that environment when you want to work on that project.
conda and mamba
conda is a package manager that is used to install software environments. It is the most popular package manager for Python, but it can also be used to install software written in other languages. mamba is a faster version of conda that is also compatible with conda commands. We'll be using mamba today.
conda and mamba are available on the Cannon cluster, however we still recommend installing them manually in a folder you have full control over (e.g. your home directory or your lab user directory).
A note on terminology
The term conda itself is used to refer to both the command line program for installing software and managing environments, and the software repository. The repository hosts software on various channels, such as conda-forge, which contains a lot of general purpose software, and bioconda, which contains a lot of bioinformatics software.
The term mamba is used only to refer to the command line program for installing software and managing environments. It is a drop-in replacement for conda and is compatible with conda commands.
Installing mamba
Today we'll be installing mamba using their recommended method of miniforge, which is just the program pre-configured for a certain channel, conda-forge.
- Type the following into your terminal:
This will download the miniforge installer to your current directory.
- Type the following into your terminal:
This will run the installer. You will be prompted to accept the license agreement, and then you will be prompted to choose an installation location. You can choose the default location, which is your home directory, or you can choose a different location.
- Type the following into your terminal:
This will update your PATH variable so that you can run mamba from the terminal.
- Type the following into your terminal:
This should show you the help menu for mamba. This means that mamba is installed and working.
You should also notice that your command prompt has changed. This is because the installer added a line to your .bashrc file that adds a string with your current environment prepended to the prompt.
It should now look something like this:
(base) [username@login-node ~]$
The (base) tells you that you're in the base environment. This is the default environment that mamba creates when you install it.
NOTE: It is best practice to never install any software into the base environment. Instead, you should create a new environment for each project you work on, which we'll cover below.
bioconda and setting up your channels
bioconda is a channel on the conda repository that contains a lot of bioinformatics software. It, along with the conda-forge channel, are likely to be the channels you'll use almost exclusively.
Navigate to the bioconda website: https://bioconda.github.io/
This website contains a lot of information about bioconda, including a list of all the software that is available on bioconda. Is there anything you notice on the front page that may be necessary for us?
Set up your conda channels.
conda config --add channels defaults
conda config --add channels bioconda
conda config --add channels conda-forge
conda config --set channel_priority strict
This will add the bioconda and conda-forge channels to your conda configuration. This means that when you install software with mamba, it will look in these channels for the software you want to install. In most cases, you can also explicitly define the channel when you install software, however this is configuration is helpful for dependencies.
Creating an environment
Let's get back to our goal for this workshop, which is to re-analyze some data in a paper (Favate et al. 2022).
We've already downloaded the raw data and organized it into our project folder.
If you've navigated away, navigate back to your project directory.
The first step in our analysis is to remove the adapters from the raw reads. To do this, we'll use a program called cutadapt.
Type the following into your terminal:
What happens?
We'll need to install cutadapt, and we want to put it in an enviornment, so let's create our first enviornment!
The typical syntax for creating an environment with mamba is mamba create -n <environment name>. The -n flag is used to specify the name of the environment. The environment name can be anything you want, but it's helpful to give it a name that is descriptive of the project you're working on.
Type the following into your terminal:
If that finishes without error, we can confirm that the environment is created:
Type the following into your terminal:
This just shows you a list of all the mamba environments you've created. You should see cutadpt-env in the list now.
Activating environments
You'll notice that, even though we've created the environment, our command prompt still says (base):
(base) [username@login-node ~]$
This is because we haven't activated the environment yet. This is critical because:
- You never want to install software into the
baseenvironment. - You want to be sure that you're running the software from the environment you installed it in. Forgetting to activate the environment you want to be in can lead to a lot of confusion and errors.
To activate the environment, we use the mamba activate command.
Type the following into your terminal:
You should see your command prompt change to show that you're in the cutadpt-env environment:
(cutadpt-env) [username@login-node ~]$
This means that any software you install will be installed into the cutadpt-env environment, and any software you run will be run from the cutadpt-env environment.
Installing software into environments
Ok, now we're in the cutadpt-env environment!
Type the following into your terminal:
Wait? Why are we still getting this error? Well, we may have created an environment that we intend to run cutadapt in, but we haven't actually installed cutadapt into the environment yet.
To do that, let's go to the bioconda website and search for cutadapt.
- Search for
cutadapton the bioconda website.- Follow the instructions to install
cutadaptinto yourcutadpt-envenvironment.
Be sure to say yes when it asks you if you want to install the software. Notice that, even though we only told it to install cutadapt, it also installed a lot of other software. This is because cutadapt has a lot of dependencies, and mamba automatically installs all of the dependencies for you.
This may take a minute or so (which is less time than if we used conda). Once it's done, we can check to see if cutadapt is installed in the environment.
Type the following into your terminal:
Finally! We should see the help menu for cutadapt. This means that cutadapt is installed in the cutadpt-env environment and we can run it from the environment.
Deactivating environments
If you want to leave an environment, perhaps to switch to another one, you can use the mamba deactivate command.
Let's deactivate the cutadapt environment now.
Type the following into your terminal:
You should see your command prompt change to show that you're in the base environment:
(base) [username@login-node ~]$
This means that any software you install will be installed into the base environment (don't do this), and any software you run will be run from the base environment. Any software that you had installed in your cutadpt-env environment will not be available from the base environment.
Running cutadapt
Now that we have cutadapt installed in our cutadpt-env environment, we can use it to remove the adapters from the raw reads of our project data. Since we're working with a lot of data, we'll want to use the cluster to run cutadapt. We'll cover more about the cluster on Day 4, but for today, we'll just set you up with an interactive session on the cluster. We'll also start a screen session so that you can run cutadapt in the background and then return to your login node or disconnect from the cluster without stopping the program.
If you came to Bonus Day 1, you already heard a bit about screen. screen is a terminal multiplexer, which is just a fancy way of saying that it allows you to run multiple terminal sessions from a single terminal. This is useful because it allows you to run a program in the background and then return to your login node or disconnect from the cluster without stopping the program.
Let's start a screen session.
Type the following into your terminal:
This will start a new screen session called cutadapt-job. Your terminal should clear and you should see a new prompt. This is the prompt for the new screen session.
Now, let's start an interactive session on the cluster.
Type the following into your terminal:
This will start an interactive session on the cluster. You should see some information about the status of the job, and then, hopefully quickly, a new prompt will pop up. The new prompt will have a different hostname than the one before, indicating that you're now on a different node on the cluster.
We'll next need to activate our cutadpt-env environment on this node:
Type the following into your terminal:
Just to be sure, you can check if cutadapt is installed in this environment:
Type the following into your terminal:
Next, navigate to the project directory:
Type the following into your terminal:
Now, we can run cutadapt on the raw reads. On later days, we'll show you how to do this in a script, but for today, we'll just run the jobs one after another.
First, make a new directory for the output files:
Type the following into your terminal:
Now, to run cutadapt.
> Type the following into your terminal:

```bash
FILENAME=rep1-rna-am.fq.gz

cutadapt -j 16 -a AGATCGGAAGAGCACACGTCTGAA -m 24 --discard-untrimmed -o data/2-adapter_removed/$FILENAME data_raw/$FILENAME &>> data/2-adapter_removed/cutadapt-report.txt
This will run cutadapt on the file rep1-rna-am.fq.gz and output the trimmed reads to a new file called rep1-rna-am.fq.gz in the data/2-adapter_removed folder. It will also output a report of the run to a file called cutadapt-report.txt. The &>> at the end of the command is used to append the output of the command to the file, rather than overwriting the file.
Here is a brief explanation of the cutadapt command:
| Flag | Description |
|---|---|
-j |
Specifies the number of threads to use for parallel execution of cutadapt. |
-a |
Specifies the adapter sequence to be used for trimming, which we have provided. |
-m |
Specifies the minimum length of the reads after trimming. |
--discard-untrimmed |
Discards any reads that do not contain the adapter sequence. |
-o |
Specifies the output file for the trimmed reads. |
&>> |
Appends the output of the command to the file, rather than overwriting the file. |
This will take around 10-12 minutes to run. Once its done, we'll run the same command for the other files, subsitutuing the name for FILENAME:
rep1-rna-ap.fq.gzrep2-rna-am.fq.gzrep2-rna-ap.fq.gz
So in total you'll run this command 4 times, once on each input file. Be sure to change the input and output file names accordingly. Alternatively, you could use shell variables to specify and update the file names.
While this is running, since we're in a screen session, we can detach the screen and talk about some other things.
To detach the screen, use the following key combination:
This will detach the screen and return you to the login node. You could disconnect from the cluster if you want, and the cutadapt program will continue to run in the background. But we'll stay connected as we keep working.
Let's make sure the screen is still running.
Type the following into your terminal:
This will show you a list of all the screen sessions that are running. You should see a screen session called cutadapt-screen. This means that the screen is still running, and the cutadapt program is still running in the background.
When we want to check on our job, we can reattach the screen.
Type the following into your terminal:
This will reattach the screen and show you the prompt for the screen session. You can then check on the progress of the cutadapt program. If it is still running, you can detach the screen again and return to the login node. Otherwise, you can start the next cutadapt command.
Software environments and reproducibility
It is already expected that researchers should share the underlying data and scripts for their analyses. One major advantage of software environments (and containers) is that they allow researchers to also share the exact software they used in their analysis. This is important because different versions of software can produce different results, and different software can produce different results. This is especially important in bioinformatics, where the software is often under active development and new versions are released frequently.
Exporting environments
Let's say that we want to share the software environment we used for our cutadapt analysis. We can do this with mamba by exporting the environment to a file.
First, if you're still in a screen session, detach from it.
Type the following into your terminal:
Next, if you're not already in the cutadpt-env environment, activate it.
Type the following into your terminal:
Now, we can export the environment to a file.
Type the following into your terminal:
This will export the cutadpt-env environment to a file called cutadpt-env.yml. This file contains a list of all the software that is installed in the environment, along with the version of the software and the channel the software was installed from. This file can be shared with others, and they can use it to create the same environment on their computer.
Let's look at the file.
Type the following into your terminal:
Now, you can hand off this file to someone else, and they can use it to create the same environment on their computer.
Importing environments
Let's say that someone else has given you a file that contains an environment. You can use this file to create the same environment on your computer. For instance, we've provided a file called env.yml that contains all the software you'll need to re-create the analyses in Favate et al. 2022.
First, make sure you're in your project directory, and if you don't have this file, copy it.
Type the following into your terminal:
cp /n/holylfs05/LABS/informatics/Everyone/workshop-data/healthy-habits-2024/day2/env.yml software/env.yml
Now, let's look at the file.
Type the following into your terminal:
You'll see cutadapt is there, but also some others. We'll talk about these specifically on Day 3. You'll also notice that this environment has a name, favate, after the first author of the paper.
Installing this can take some time, so let's start another screen session:
First, make sure you're not still attached to a screen.
Type the following into your terminal:
If any of the listed screens have the status (Attached), you'll need to detach from them by typing screen -d -r <screen name>. If you don't see any screens with the status (Attached), you can start a new screen session.
Type the following into your terminal:
This will start a new screen session called favate-screen. Your terminal should clear and you should see a new prompt. This is the prompt for the new screen session.
Let's check the status of the screen.
Type the following into your terminal:
This will show you a list of all the screen sessions that are running. You should see a screen session called favate-screen, and the status should be (Attached). You should also still see your cutadapt-screen session. This means that the screen is still running, and the cutadapt program is still running in the background.
Let's create the environment from this file.
Type the following into your terminal:
This will create an environment called favate. Make sure to say yes when it prompts you to install the software. This may take some time to run as it is installing a lot of software at once, so once you have said yes, you can detach from the screen and return to the login node.
To detach the screen, use the following key combination:
Now, you can switch between your cutadapt-screen and favate-screen sessions by using the screen -r <screen name>, Ctrl-a d, and screen -ls commands. Do so until all the cutadapt jobs are done, and the favate environment is installed.
Once the favate environment is installed, you can activate it and check to see if the software is installed.
Once the cutadapt jobs are done, you can exit the interacitve cluster session by typing exit.
Once you're sure you're done with the screen sessions, you can stop them by typing exit from within the screen or screen -X -S <screen name> quit.
conda/mamba BONUS material
BONUS: Installing specific versions of software
You may have noticed that mamba installed the latest version of cutadapt. This is usually what you want, but sometimes you may want to install a specific version of a program. For example, if you're working on a project that was written for an older version of a program, you may want to install that specific version. You can do this with mamba by specifying the version of the program you want to install.
To do this, you would use the syntax mamba install <program name>=<version number>. For example, if you wanted to install version 1.2.3 of a program called example, you would run mamba install example=1.2.3.
BONUS: Installing multiple programs at once
You may have also noticed that mamba installed a lot of other software along with cutadapt. This is because cutadapt has a lot of dependencies. This is usually what you want, but sometimes you may want to install multiple programs at once. You can do this with mamba by specifying the names of the programs you want to install.
To do this, you would use the syntax mamba install <program1> <program2> <program3>. For example, if you wanted to install example1, example2, and example3, you would run mamba install example1 example2 example3.
BONUS: Installing software from a specific channel
You may have also noticed that mamba installed the software from the bioconda channel. This is usually what you want, but sometimes you may want to install software from a different channel. You can do this with mamba by specifying the channel you want to install the software from.
To do this, you would use the syntax mamba install -c <channel name> <program name>. For example, if you wanted to install a program called example from a channel called example-channel, you would run mamba install -c example-channel example.
You can search for software from any channel from Anaconda.org.
BONUS: Installing software as you create an environment
You may have also noticed that we created the cutadpt-env environment and then installed cutadapt into it. This is usually what you want, but sometimes you may want to install software into an environment as you create it. You can do this with mamba by specifying the names of the programs you want to install when you create the environment.
To do this, you would use the syntax mamba create -n <environment name> <program1> <program2> <program3>. For example, if you wanted to create an environment called example-env and install example1, example2, and example3 into it, you would run mamba create -n example-env example1 example2 example3.
BONUS: Searching for packages from the command line
You can also search for software from the command line with mamba, though this tends to take longer than just searching from the web.
The syntax for this is mamba search <search term>. For example, if you wanted to search for all the software that is available on the bioconda channel, you would run mamba search -c bioconda.
BONUS: Deleting environments
If you want to delete an environment, you can use the mamba remove -n <environment name> --all command. This can sometimes take a lot of time. It is also possible to simply remove the folder where the environment is stored (miniforge3/envs/<ENV NAME>/).
Other package managers and software repositories
We've talked exclusively about conda up until this point because it is the most popular package manager for Python and bioinformatics software. However, there are other package managers that are used for different types of software. For example, pip is a package manager that is used to install Python packages, and apt is a package manager that is used to install software on Ubuntu systems. brew is a package manager that is used to install software on macOS systems. And CRAN is a software repository for R.
BONUS: Installing software with pip
pip is a package manager that is used to install Python packages. It is installed with Python, so you don't need to install it separately. You can use pip to install Python packages into an environment, just like you can use mamba to install software into an environment. We usually recommend using mamba to install Python packages, but sometimes you may need to use pip instead.
The basic syntax to install a Python package with pip is pip install <package name>. For example, if you wanted to install a package called example, you would run pip install example.
BONUS: Installing R packages with CRAN
CRAN is a package manager for R. It is used to install R packages. CRAN is more self-contained than conda and pip in that you only install packages from within R. You can use the install.packages function to install packages from CRAN. For example, if you wanted to install a package called example, you would run install.packages("example").